All circuits discussed on this page were designed by Mike Mladejovsky, WA7ARK. This description is by Gordon Smith, K7HFV and Clint Turner, KA7OEI:
Overview:
The DF unit circuit diagrams include information to build two different types of DF “homing” circuits. The first is the simpler of the two - and the earlier one. Its circuit uses only a single 565 PLL IC. It has no indicator on the box but passes information through a tone that appears in the receiver's audio.
The second circuit is a later version that uses three IC's. Its
output
indication is through a zero-center 50-microamp meter. It uses a
windowing
circuit to limit sampling of the receiver output to the times when the
antennas switch - a technique that is believed to reduce perturbation
of
readings due to audio on the received signal.
The circuits described on this page
are of the "Homing" or "TDOA" type in that they switch two antennas
rapidly and, by observing phase changes in the incoming RF signal,
allow the user to determine the bearing of the transmitter.
These types of circuits have several
sets of advantages and disadvantages:
Advantages:
The Diagrams:
There are three diagrams, covering both the "Audible FM DF" circuit and the "Switched Capacitor Matched Filter FM DF Circuit."
Operation:
Each circuit has three electrical connections to the outside world:
Warning:
The first order of business is to disable the transmit on your radio!Using the DF unit:If you do accidentally transmit (even briefly!) you run the risk of destroying the switching diodes on the antenna. If you forget and make some longer transmissions, there is the risk that you may damage the power output stages of your transmitter! Many radios (such as handie talkies) have some means to disable transmit - often in a menu or in the "keyboard lock" function, while other radios don't have such an option. On these latter types of radios disconnecting the microphone may do the trick.
Keep in mind that there are some radios (such as the Yaesu FT-470) that, when powered up, will sometimes transmit a brief burst of power: With these radios, connect the DF antenna after you turn the radio on. Generally speaking, radios that have a "soft" power switch (i.e. a button that, when pressed, signals the computer to turn the radio on) do not have this problem. If you have a radio with a truly mechanical power switch (i.e. on the volume control, or a push-on/push-off ) it may be better to err on the side of caution and connect the DF unit only after the radio has been turned on.
If you have never used this sort of DF unit, the antenna orientation
may be confusing at first. In looking at the picture, it looks
like a 2 element Yagi - but is not. Think of it as a pair
of
side-by-side vertical dipole antennas.
|
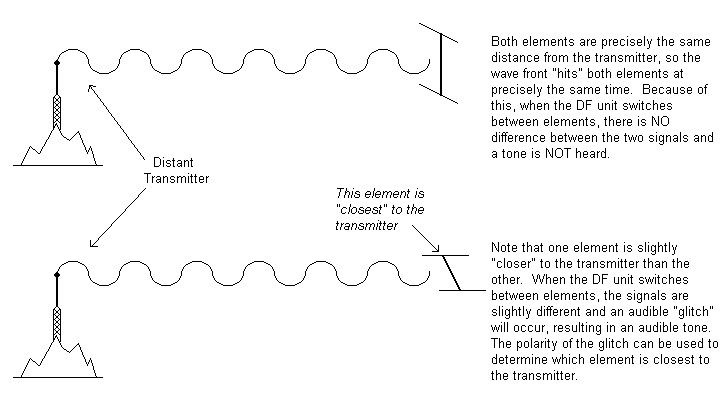
The way the antenna unit is held is with the two dipoles oriented vertically. If you were to have the antenna unit directly in front of you, one of the dipoles would be on the left, and the other would be on the right, and they would each be the same distance from you. When the antenna is "pointed" at the signal source, neither of the elements are actually pointed at the source, but the two elements are actually the same distance from the transmitter. For a visual explanation of this, look at the drawing on the right.
To identify the bearing of an incoming signal, the antenna must be physically rotated. The indicator (tone or meter) will show the operator which way to rotate and will help distinguish the true bearing from the one 180° away. When the antenna is in the correct position, its plane will be perpendicular to the line to the signal source. In other words, the antennas will be broadside to the source.
The aural unit: The tone heard in the speaker will null (almost disappear) when the antenna is "aimed" directly at the signal source. As the antenna is rotated, the pitch of the tone will change. The user can choose whether he would like the pitch to rise or fall as the antenna is rotated clockwise through the true bearing simply bo the way the antenna is oriented. Simply try both broadside positions on a signal whose bearing is known (e.g. a repeater in a known location) and see which one causes the desired behavior, then mark the mast to show which side is the “front,” that is, the one pointing toward the signal source. When finding the bearing of an unknown signal, make sure the tone changes in the correct manner as you rotate through the null. If not, rotate a full 180 degrees and find the other null. Now the “front” will point to the signal source. (Note: If, when trying to locate a signal source, the antenna suddenly seems to be "backwards" from the way it was originally set up, it could be that the signal is behind you...)
The metered unit: This unit works similarly, except that the meter is used as the indication of which way to rotate the antenna rather than the tone pitch. Most users will want to calibrate the unit so that when the meter is pointing to the left of center, it indicates the antenna is pointing too far left and vice-versa. Again, check with a known signal to determine which side of the antenna should be considered the “front.” Then, the meter behavior on an unknown signal will indicate whether a 180-degree reversal is necessary.
How it works:
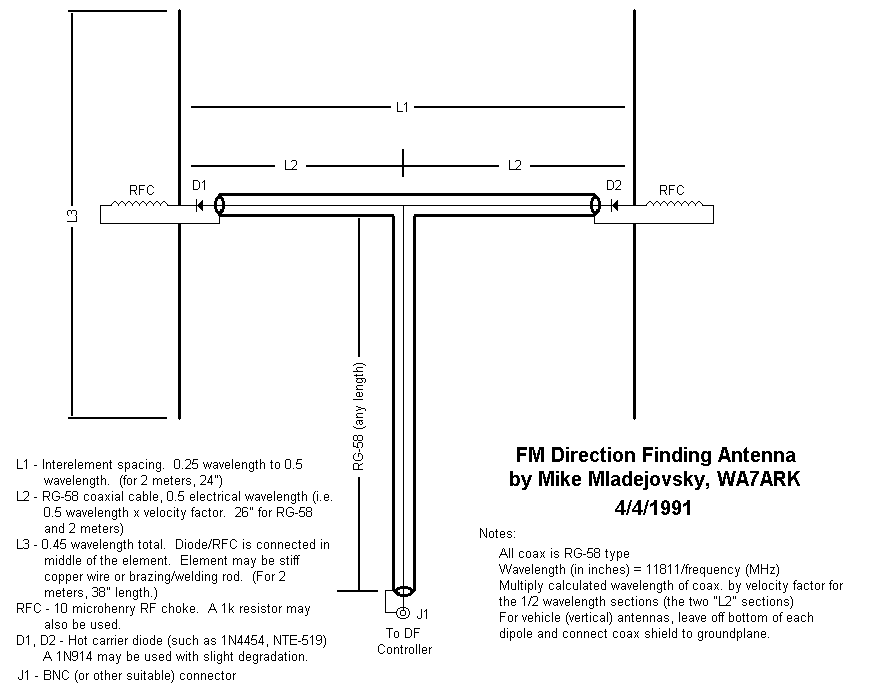
Theory of Operation - Antenna Unit:
The antenna is simply a pair of vertical dipoles. The diodes in each dipole allows the circuit to select which antenna is active at any given time. When a positive voltage is sent up the coax feedline, diode D1 will conduct and D2 will block, making the left antenna active and disabling the right antenna. A negative voltage will cause D2 to conduct and D1 to block, reversing the situation - hence the need for the diodes to be installed "backwards" with respect to each other.
Either version of the homing unit will switch back and forth between the two antennas at an audio rate. If the antenna plane is oriented broadside to the incoming signal, there will be little change as the switching is done and the tone will disappear. However, if the antenna plane is oriented in any other way, the two antennas will be at different distances from the source: This will cause a change in phase of the received signal at each switch, or, in other words, phase modulation and a resulting tone.
Since phase changes also cause a momentary frequency shift, these switches will appear in the audio of an FM receiver as positive and negative pulses (e.g. the tone.) If one antenna is closer to the signal source than the other (even if this means an inch or two - even though the signal you are receiving may be miles away) this will cause a tone to appear in the aural unit, allowing the unit to determine which antenna is closer to the source.
Theory of Operation- Aural Circuit:
The only active device in the aural circuit is an NE565 phase-locked loop (PLL) IC. The circuit does not use it as a PLL, but rather uses its two components: an oscillator and a phase detector. The oscillator is used to send the switching signal to the antennas through R1 and its associated 10-uF capacitor.
The phase comparator portion of the IC is used to measure the amplitude of the switching pulses coming back in the receiver's audio and also see whether they are in-phase or out-of-phase with the switching squarewave the oscillator (VCO) is putting out. Strong pulses one direction mean that you are far off from the desired broadside bearing in one direction, say left. As you approach the broadside position, the pulses get weaker, and just disappear as you pass through the "dead-on" position. If you continue rotating, the pulses reappear, but now with their phase reversed compared to the oscillator. The reappearance of pulses causes the tone to reappear. The phase reversal causes the comparator voltage to be on the other side of center than before, so the frequency of the VCO is also on the other side of it's center point (for example, lower in pitch).
The phase comparator is connected to the VCO internally in the IC, so the phase comparator output (which is following the antenna position) always controls the pitch of the tone heard.
Adjustment and Calibration: Once the circuit is constructed, there are two simple adjustments to be made. First, set R4 ("Pitch Adjust") to the middle of its rotation.
Adjusting R1: The purpose of R1 is to set the level into the IC so that it responds properly to signals at normal volume levels, but isn't overdriven.
Tune in a signal and set the volume control at a very low SETTING (lower than that which you are likely to ever use - you may need to put your ear up to the speaker to hear it well) and turn R1 "up" all of the way (so the wiper of the potentiometer is closest to C1.) Rotating the antenna back and forth, you should hear the tone go up and down, depending on the antenna's orientation. Now, turn R1 down and find the point at which the unit no longer responds to the orientation of the antenna - and then turn it back up so the unit just starts to respond: In other words, you are setting R1 above the "ragged edge" at the lowest volume setting that you are likely to use. Once this is done, you might want to verify that the unit still responds properly at the highest volume control setting that you are likely to use.
Adjusting R4: The purpose of R4 is to set the "pitch" of the tone you are hearing. In normal operation, the pitch of the tone will vary depending on if the signal is to the right or the left of the antenna. R4 sets the "middle" of the range of tone pitch that is used.
Listening to a signal, move the antenna back and forth and you should hear the tone sweep from hight to low (and/or vice versa.) Simply adjust R4 so that the range of tones is to your liking. It would be best to avoid tones that are too low in pitch or too high. Preferably, the tones should be in the range of those tones you hear on a telephone keypad (i.e. 500-1700 Hz.)
Theory of Operation- Metered Circuit:
The metered circuit uses three IC's: An LM324 quad operational amplifier, a CMOS 4017 Johnson counter, and a CMOS 4066 quad switch. One section of the 324 is used as the antenna switching oscillator. (It is the section having pins 12, 13, and 14.) The oscillator runs at a frequency of approximately 10 kHz and is divided by ten by the Johnson counter. The “carry” output provides a 1-kHz square wave which is buffered by one of the 324 sections and used to drive the feedline (and, ultimately, the antenna switching diodes).
The received audio is applied to 1-microfarad capacitors through two CMOS analog switches. One of the two switches is turned on only during the period when the received audio is expected to contain a pulse resulting from the positive-going edge of the antenna switching signal. The voltage held on the associated capacitor should represent the amplitude of this pulse. Similarly, the other switch is turned on only during the period when the pulse resulting from the negative-going edge of the antenna switching signal is present.
The two capacitor voltages are buffered using two more sections of the LM324. Their outputs drive the zero-center meter differentially. A 10-K potentiometer may be substituted for R4 to allow the full-scale range of the meter to be adjusted so that full-scale is just achieved with the antennas pointed 90° away from the signal source (using a "clean", noise-free signal) and the receiver volume adjusted to a comfortable listening level.
The time delay between the switch of the antennas and the resulting pulse in the receiver output will vary from one receiver to another due to varying delays in the IF and audio sections of the receivers. The DF unit must be adjusted to compensate for this delay so the two gates open at the correct times. The adjustment is done by choosing outputs of the Johnson counter as indicated by the jumpers at “X” and “Y.” If the same DF unit is to be used with multiple receivers, the builder might want to include a two-pole rotary switch to select the taps, so they can be changed quickly.
Adjustment and calibration: Adjustment and calibration of this unit is somewhat more complicated than for the Aural DF circuit above.
The easiest way to find the correct 4017 outputs for a particular receiver is probably to use a dual-trace oscilloscope. Connect one oscilloscope input to the receiver output, tune the receiver to a channel where a carrier is present, and point the antenna in a direction where a clear tone can be heard (i.e. not at the signal source: Remember that the tone is "nulled" out when you are pointed directly at the signal.) Adjust the oscilloscope to see the rising and falling pulses resulting from the antenna switching.
Now connect the input for the second channel of the oscilloscope to each of the Johnson counter outputs until a match is found with the positive pulse in the receiver audio. Each counter output will have a positive-going pulse lasting about one-tenth of the antenna switching period. Choose the one that comes closest to coinciding with the receiver pulse. Ideally the entire receiver pulse should fall inside the time period when the counter pulse is active. Connect the “X” jumper to this output. Note: If the pulse lands right on the boundary between two "window" periods, try adjusting the frequency of the oscillator up or down slightly to better "center" the pulse in a window. Although the switching rate is nominally 1 kHz (derived from a 10 kHz oscillator) it could practically be anything between 700 Hz and 1500 Hz (e.g. 7 kHz to 15 kHz oscillator frequency.) Note that the "windowing" function is somewhat more effective at the higher frequencies.
Similarly, find another output which most closely coincides with the negative-going pulse from the receiver. Connect the “Y” jumper to this output (this will be five outputs away from the one found for the positive-going pulse.) For example, if output number 2 was chosen in the first step, output number 7 is the most likely candidate for the second step.
If you don't have an oscilloscope the taps may be adjusted through experimentation: Find the two taps (the two taps should always be five taps apart from each other as mentioned above) that produce the best reading on the meter. Note again that there are only 5 possible positions (e.g. taps 0 and 5, 1 and 6, 2 and 7, 3 and 8, and 4 and 9.)
Note: The taps should be selected using the receiver that you plan to use for DFing. Using a receiver of a different model or brand may require that the taps be readjusted for best performance - hence the recommendation of the two-pole 5-position rotary switch if you plan to use it on different receivers.
The interference-rejecting properties of this circuit are a result of the “windowing” technique. The metering circuit only "looks" at the receiver output during two short windows of time, each representing about ten percent of the total antenna switching cycle. Thus, the receiver output is ignored 80% of the time.
While the greatest deflection will be obtained with the antenna 90 degrees to the bearing of the signal, unless the signal is "clean" and without modulation, the amount of meter deflection will be reduced, diluted by noise and incidental modulation on the signal being received. As with any direction-finding system, one should look for overall trends in the bearing obtained (e.g. left or right) rather than immediately acting on sudden changes. For example, if a strong bearing shift is indicated, it is a good idea to continue walking - or move around in the general area - to see if this general trend persists. As one practices finding transmitters, the various quirks and nuances of discerning actual bearings from reflections/multipath will become more apparent.
Return to the UARC RDF page
or Return to the UARC
home
page
This page updated on 20061017